常見問題

Create email accounts Guide

Step 1 : Choose “Mail,Contacts, Calendars”.


Step 2: Click “Add Account…”.


Step 3: Choose “Other”.


Step 4: Click “Add Mail Account”.


Step 5:


提示

(1)  Name

Arbitrary input

(2)  Email

Enter your email address

(3)  Password Enter your email passowrd
(4)  Description Arbitrary input
(5)  Click “Next”


Step 6: Incoming Mail Server Setting


提示

(1) Choose “POP:.

(2) Host Name Enter “pop” and “.” and “Your domain name”

(3) Username

Enter your email address

(4) Password

Enter your email passowrd


Step 7: Outgoing Mail Server Setting


提示

(1) Host Name Enter “smtp” and “.” and “Your domain name”

(2) Username

Enter your email address

(3) Password

Enter your email passowrd

(4) Click “Save”.


Step 8: Click “Yes”.


Step 9: Click “Save”.


Category: Email
Create email accounts Guide

Step 1 : Choose “Mail,Contacts, Calendars”.


Step 2: Click “Add Account…”.


Step 3: Choose “Other”.


Step 4: Click “Add Mail Account”.


Step 5:


提示

(1)  Name Arbitrary input
(2)  Email Enter your email address
(3)  Password Enter your email passowrd
(4)  Description Arbitrary input
(5)  Click “Next”


Step 6: Incoming Mail Server Setting


提示

(1) Choose “POP:.
(2) Host Name Enter “pop” and “.” and “Your domain name”
(3) Username Enter your email address
(4) Password Enter your email passowrd


Step 7: Outgoing Mail Server Setting


提示

(1) Host Name Enter “smtp” and “.” and “Your domain name”
(2) Username Enter your email address
(3) Password Enter your email passowrd
(4) Click “Save”.


Step 8: Click “Yes”.


Step 9: Click “Save”.


Category: Email
The Internet Service Providers’s SMTP Agreement

Netvigator (Home) mail.netvigator.com / smtp.netvigator.com
(Commercial) corpmail1.netvigator.com
HKBN smtp.bbmail.com.hk
smtp.hkbn.net
smtp2.incnets.com
smtpo.hkbn.net
smtp3.ctimail3.com
The Wharf smtp.mail.hkbnes.net
smtp.newtthk.com
smtp2.wtt-mail.com
Hutchison Global Communications mail.on-nets.com
Pacnet smtp.pacific.net.hk
ixtech smtp.ixmail.hkcix.com
Cyber Express Communication Ltd. smtp.cyberec.com
I-Cable smtp.i-cable.com
HKBN smtp3.ctimail3.com
ABCNET mail.hkabc.net
HKC smtp.hkcmail.com
SmarTone-Vodafone smtp.ismart.net
CPCNet smtp.email.hk.net

Free Internet Email’s SMTP Agreement

Yahoo! Mail Settings
    Yahoo Incoming Mail Server (POP3) – pop.mail.yahoo.com (port 110)
    Yahoo Outgoing Mail Server (SMTP) – smtp.mail.yahoo.com (port 25)
Google GMail Settings
    Google Gmail Incoming Mail Server (POP3) – pop.gmail.com (SSL enabled, port 995)
    Outgoing Mail Server – use the SMTP mail server address provided by your local ISP or smtp.gmail.com (SSL enabled, port 465)
Hotmail Mail Settings
    pop3.live.com (SSL enabled, port 995)
    Outgoing Mail Server – smtp.live.com (SSL enabled, port 25)
Lycos Mail Settings
    Lycos Mail Incoming Mail Server (POP3) – pop.mail.lycos.com (port 110)
    Outgoing Mail Server – smtp.mail.lycos.com or use your local ISP SMTP mail server
AOL Mail Settings
    AOL Incoming Mail Server (IMAP) – imap.aol.com (port 143)
    AOL Outgoing Mail Server – smtp.aol.com or use your local ISP SMTP mail server
Mail.com Mail Settings
    Mail.com Mail Incoming Mail Server (POP3) – pop1.mail.com (port 110)
    Outgoing Mail Server – use your local ISP SMTP mail server
Netscape Internet Service Mail Settings
    Netscape Internet Service Incoming Mail Server (POP3) – pop.3.isp.netscape.com (port 110)
    Netscape Internet Service Outgoing Mail Server – smtp.isp.netscape.com (port 25, using a secure SSL connection)
Tiscali Mail Settings
    Tiscali Incoming Mail Server (POP3) – pop.tiscali.com (port 110)
    Outgoing Mail Server – use your local ISP SMTP mail server
Freeserve Mail Settings
    Freeserve Incoming Mail Server (POP3) – pop.freeserve.com (port 110)
    Outgoing Mail Server – use your local ISP SMTP mail server
Supanet Mail Settings
    Supanet Incoming Mail Server (POP3) – pop.supanet.com (port 110)
    Outgoing Mail Server – use your local ISP SMTP mail server
Category: Email

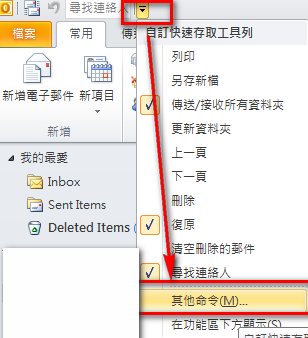
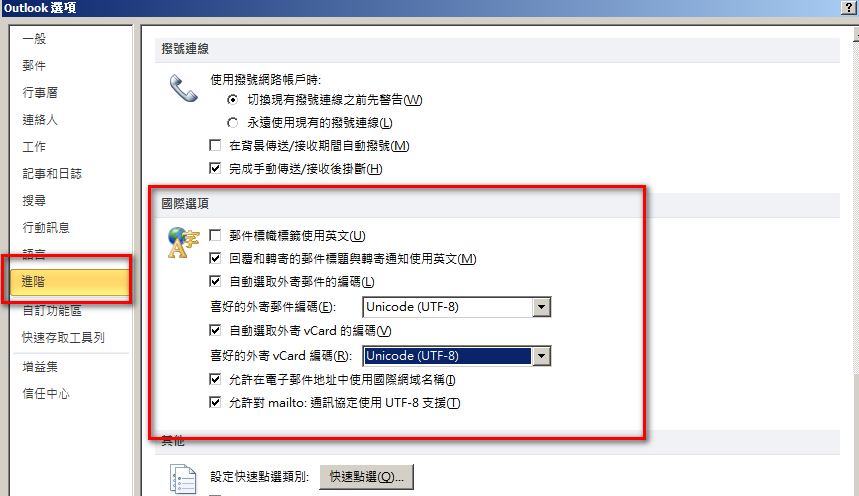
Outlook 2010 email cannot display Chinese characters, etc. You can set change the character encoding in outlook.


Category: Email
Create email accounts Guide

Step 1: First, open the Microsoft Office Outlook 2010.

Step 2: (1)Click “File”(2) Then click “Account Setting” 。(3)And then click “Add or remove accounts or change existing connection settings. '


Step 3: (1) Click “Add”


Step 4:

(1) Choose“Manually configure server settings or additional server types” (2) And Click “Next”


Step 5:

(1) Click “Internet e-mail” . (2)Then click “Next” .


Step 6:


Tips

(1)•  Your name : xxxx

Arbitrary input

(2)•  Email address : xxxx @ xxxxxx.xxx

Enter your email address

(3)•  Incoming mail server (POP3): pop.xxxxx.xxx Enter “pop” and “.” and “Your domain name”
(4)•  Outgoing mail server (SMTP): smtp . xxxxx.xxx Enter “smtp” and “.” and “Your domain name”

(5)•  User name : xxxx @ xxxxxx.xxx

Enter your email address

(6)•  密碼 : xxxx

Enter your email password

(7)•  Click “Other settings”


Step 7:

(1) Click “Outgoing Server” (2)Choose “My outgoing server SMTP requires authentication” (3) Then click “OK”


Step 8:

(1) Click “Next”.


Step 9:

(1) Click “OK”.


Category: Email
Create email accounts Guide

Step 1: Turn on the Microsoft Office Outlook 2007.

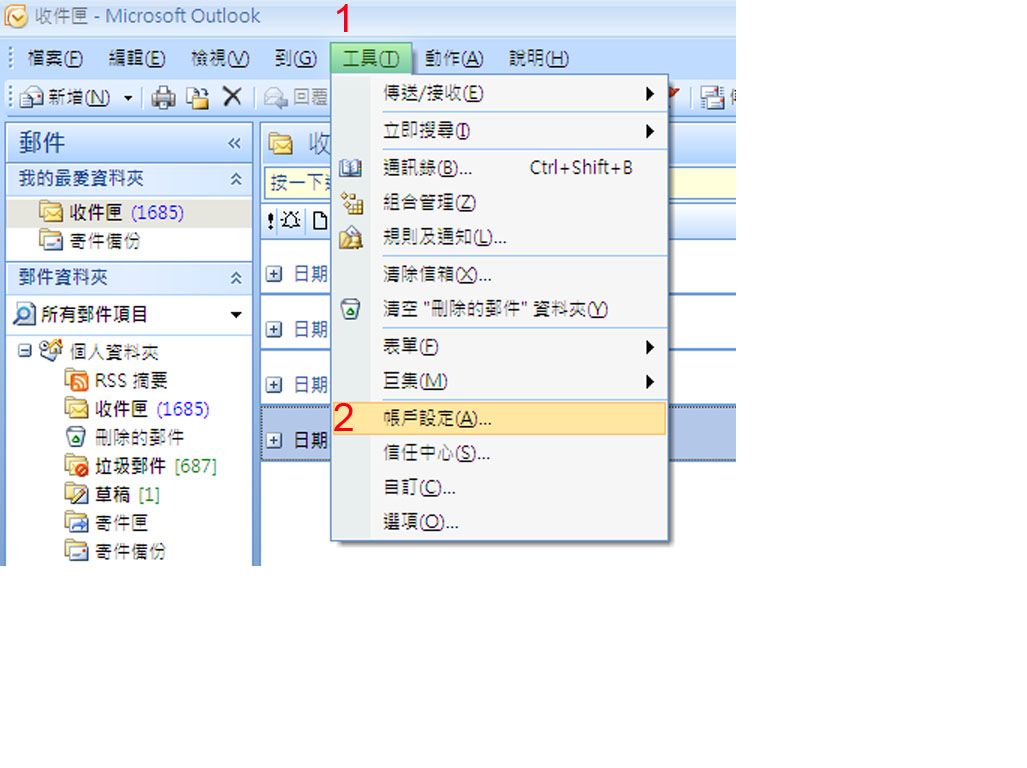
Step 2: (1) Click “Tool” . (2) Then Click “Account Settings”


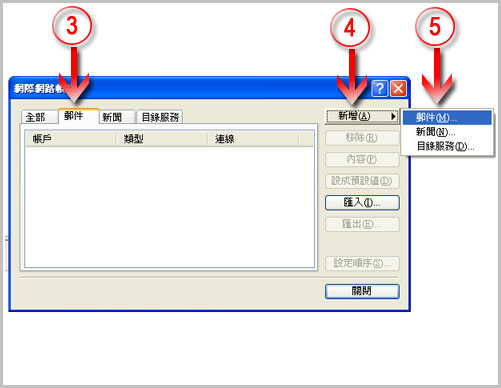
Step 3: (1) Click “Add”


Step 4:

(1) Choose『 Microsoft Exchange 、 POP3 、 IMAP or HTTP 』 (2) Then Click “Next”


Step 5:

(1) Choose “Manually configure server settings or additional server types” (2) And click “Next”


Step 6:

(1) Click “Internet e-mail”. (2) And Click “Next”


Step 7:


Tips

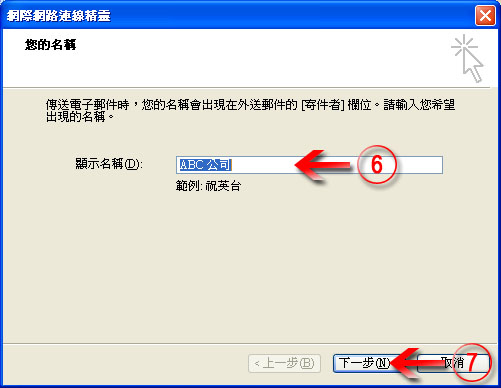
(1)•  Your Name : xxxx

Arbitrary input

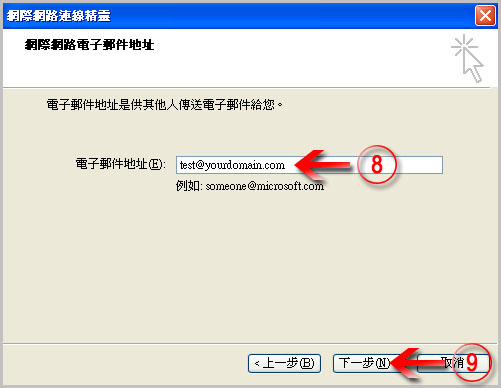
(2)•  Email addresses:xxxx @ xxxxxx.xxx

Enter your email address

(3)•  Incoming mail server (POP3): pop.xxxxx.xxx Enter “pop” and “.” and “Your domain name”
(4)•  Outgoing mail server (SMTP): smtp . xxxxx.xxx Enter “smtp” and “.” and “Your domain name”

(5)•  Username: xxxx @ xxxxxx.xxx

Enter your email address

(6)•  password: xxxx

Enter your email passowrd

(7)•  Click “Other Settings”


Step 8:

(1) Click “Outgoing Server”. (2)Choose “My outgoing server SMTP requires authentication” (3) Click “OK”


Step 9:

(1) Click “Next”.


Step 10:

(1) Click “Finish”.


Category: Email
Create email accounts Guide

Step 1: First, open the Microsoft Office Outlook 2003.

Step 2:(1)Click“Tools”.(2)Then click “E-mail account.”


Step 3:(1)First choose“View or change existing e-mail account.” .(2)Then click“Next”.


Step 4:

(1)『POP3』.(2)Then Click “Next”.


Step 5:


Tips

•  Your Name : xxxx Arbitrary input
•  Email addresses : xxxx @ xxxxxx.xxx Enter your email addresses
•  User name : xxxx @ xxxxxx.xxx As above
•  Password: xxxx Enter your email password
•  Incoming mail server (POP3): pop.xxxxx.xxx Enter “Pop” and “.” and “your domain name”
• Outgoing mail server (SMTP): smtp . xxxxx.xxx Enter “smtp” and “.” and “Your domain name”
•  Click “Other Settings”  


Step 6:

(1)Choose“Outgoing Server”.(2) Choose“My outgoing server SMTP requires authentication”(3) and Click“OK”


Step 7:

(1)Click“General”(2)In “Mail account “spaces, enter the name of the account you want to “show”.(3)and Click “OK”


Step 8:

(1)Click “Next”.


Step 9:

(1)Click “Finish”.


Category: Email
Create email accounts Guide

First, open Outlook Express


Click:

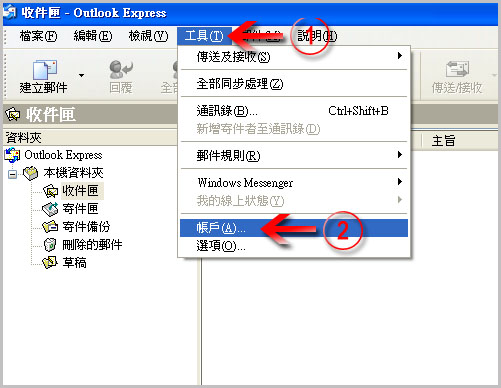
(1) “Tools

(2) “Account

(3)  “Mail
(4)  “Add
(5)  “Mail

(6)  Display Name (any name your like)
(7)   Next

(8)  e-mail address: (enter entire e-mail addr)*   
       *Pls refer to the welcome letter

(9 )  “Next”


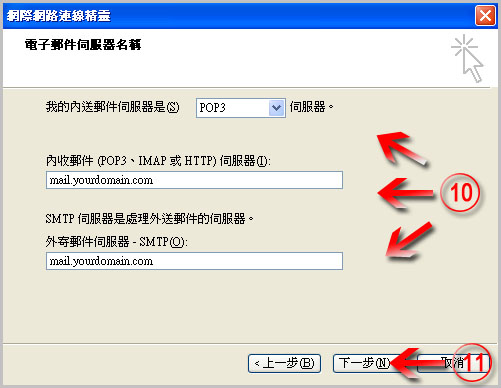
(10) Servre info:
    server: POP3
    Incoming mail: (mail.yourdomain.com) *
    Outgoing mail server : (mail.yourdomain.com) *
           * Pls refer to the welcome letter
(11 )  Next

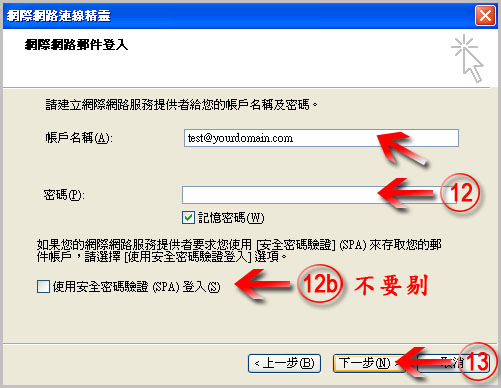
(12) Login info

      Account Nam: (enter entire e-mail addr)*   
      Password:  (enter you password)* 
      * Pls refer to the welcome letter
 

(12b)
Careful !!  

Don't click !!使用安全密碼驗證(spa)登入”  


(13 )  Next

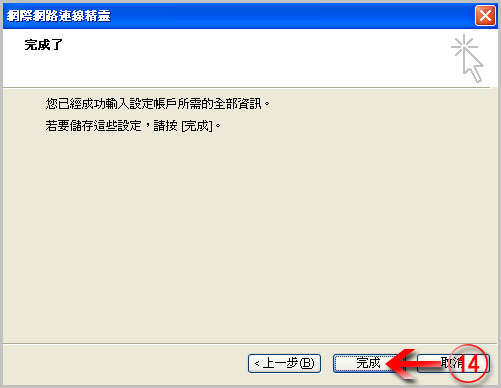
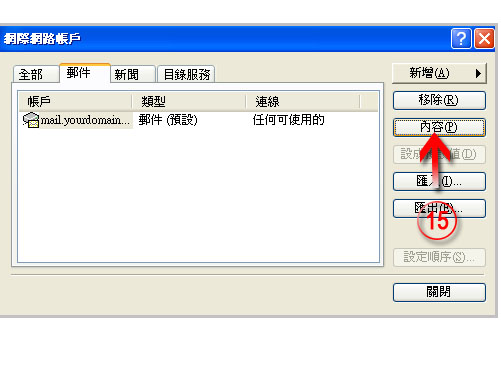
(14) “Finish”   <<not yet finish, pls continue steps (15)-(24)

(15)  “Properties”

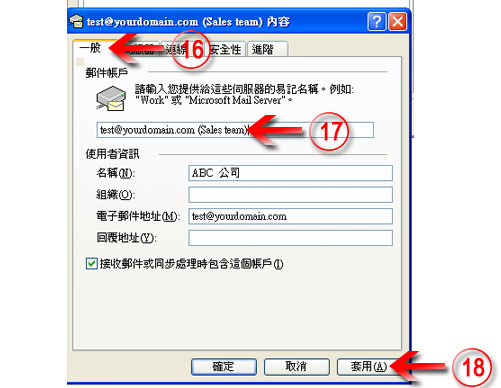
(16)  click“Gerneral” page
(17)  Internal disply name (any name your like)
(18)  “Apply

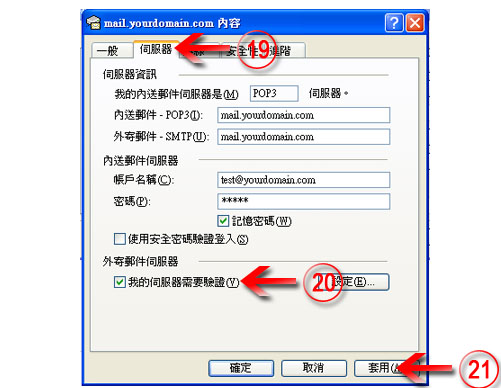
(19 )  click “server” page
(20) tick  我的伺服器需要驗證 (must!!)
(21)   “apply

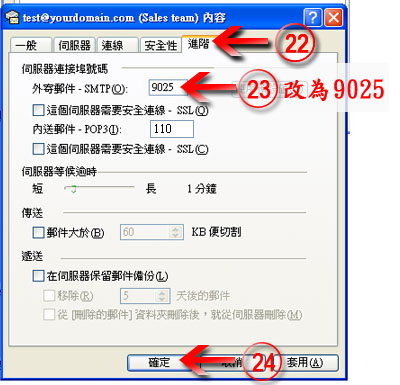
(22)   click”advance” page
(23)  “outgoing server” amend from 25 to 9025.
(24) ok

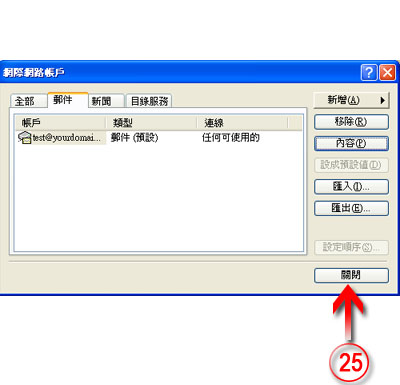
(25) Finally, click “Close” start to use.


Category: Email

Load More

  • For Outlook 2019 + Outlook 2016 + or Outlook 365:
HKEY_CURRENT_USER\Software\Microsoft\Office\16.0\Outlook\Profiles
  • Outlook 2013:
HKEY_CURRENT_USER\Software\Microsoft\Office\15.0\Outlook\Profiles
  • For Outlook 2010:
HKEY_CURRENT_USER\Software\Microsoft\Windows NT\CurrentVersion\Windows Messaging Subsystem\Profiles
Category: FAQ
  1. Start the registry editor. (Type regedit in the Search box.)
  2. Navigate to the following registry subkey: HKEY_LOCAL_MACHINE\System\CurrentControlSet\Control\Terminal Server\WinStations\RDP-Tcp
  3. Find PortNumber
  4. Click Edit > Modify, and then click Decimal.
  5. Type the new port number, and then click OK.
  6. Close the registry editor, and restart your computer.
Category: FAQ

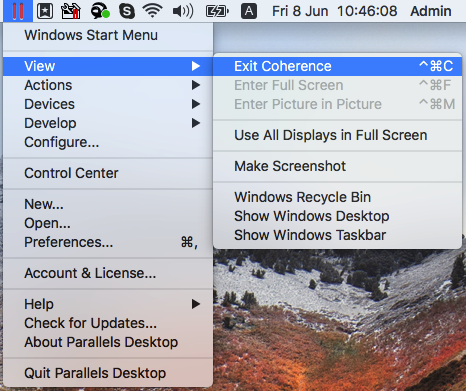
  • Click on the Parallels icon in the Mac menu bar and select View then click Exit Coherence.
Category: FAQ

Category: FAQ

Below is a list of the Common Key Commands to access the factory restore at startup:

ACER– Turn on the computer and hold down ALT. While holding it down tap the F10 key. This will bring up the Acer Erecovery screen. Next choose Restore System to Factory Default.

ASUS– Tap the F9 key at startup. If F9 doesn't work, turn off the PC, turn it back on, and immediately tap the F8 key and navigate to “Repair Your Computer” to get to the options for the factory restore.

COMPAQ– Compaqs usually use F11 at startup to access the factory restore. If that doesn't work you can also try F10 or F8 and then select “Repair your Computer”.

DELL– You can access the system restore on most Dell computers by tapping the F8 key when the PC first turns on. This will take you to the “Advanced Boot Options” menu. Use the arrow keys on your keyboard to select “Repair Your Computer”. Next click “Dell Factory Image Restore”.
use F12 to go to Bio.

GATEWAY- Tap F8 and select “Repair Your Computer” to access the options for the factory restore.

HP– Most HP's use the F11 key at startup to access the factory restore. HP's calls it the “Recovery Manager”.

IBM- IBM's almost always use the F11 key at startup to access the recovery partition.

LENOVO– Lenovo PC's use F11 at start up to access the factory restore.

SAMSUNG– Samsung PC's usually use F4 at startup. Also try F6 and F8.

TOSHIBA– Toshiba PC's usually use F8 and then select “Repair Your Computer“. If that doesnt work, turn off the PC, Hold down the “0” key, and while holding it down, turn on the PC

Category: FAQ

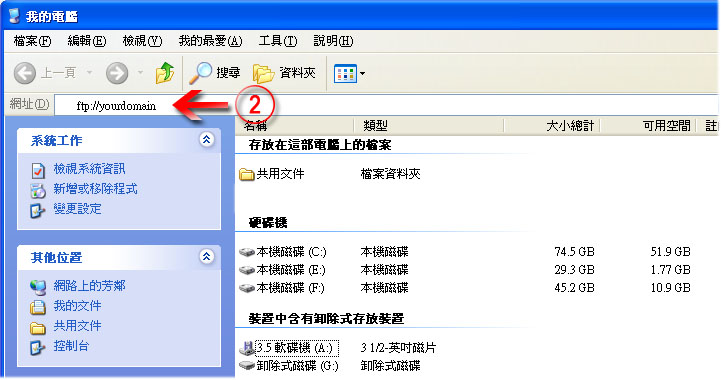
How to use FTP?


How to use FTP?


Click:

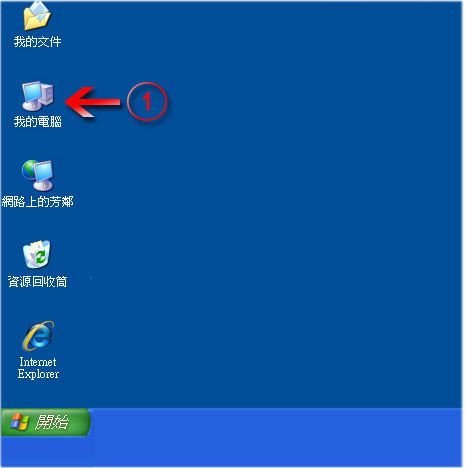
(1) “My Computer

(2) Enter  ftp://yourdomain 
               (refer to the “Welcome Email”)

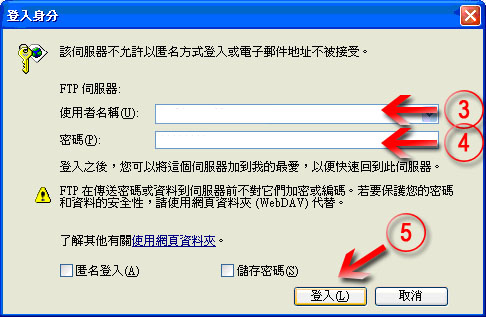
(3) Username: (refer to the “Welcome Email”)

(4) Password(refer to the “Welcome Email”)

(5) “login

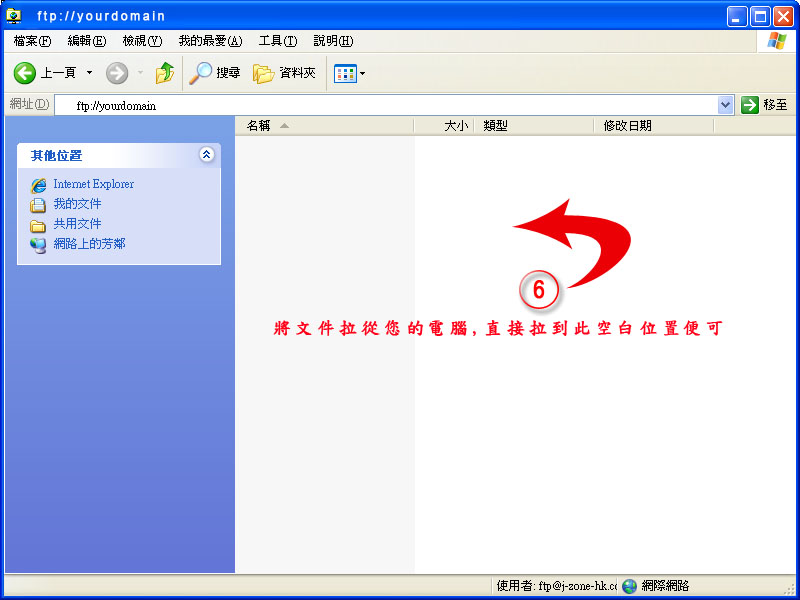
(6)  Paste your file that you want to upload to the FTP in the blank

Category: FAQ

Load More